

The Raspberry Pi is a great inexpensive, single board computer that can be used to rapidly prototype embedded systems. The Raspberry Pi (RPi) usually runs Raspian or some other offshoot of Linux. One of the annoyances of developing software on this platform is that you need an extra monitor, keyboard and mouse in order to get anything done. This blog will walk Raspberry Pi developers through how to setup their system so that it has a static ip address that can be used to remotely login and develop software on the RPi through SSH. At which point only an ethernet connection and power is required! By default, Raspian comes configured to run all network adapters as DHCP, allowing the operating system to negotiate and get an ip address from the network on its own. The issue with this is that if a developer wants to login remotely over SSH, they need to know the ip address of the RPi. Using DHCP means that the RPi ip address may change making it difficult to login without hunting down the ip address. This makes the first order of business to set the network address of the RPi to a static and always known address. STEP 1 – Gather Network Settings There are three pieces of information that is needed in order to setup a static ip address: the desired ip address, the network gateway address and the netmask. The network gateway and netmask can both be found by using just one terminal command. In a terminal type: netstat -nr The result should look something similar to  The result of this command reveals that the Gateway of the network is 10.0.0.2 while the netmask is 255.255.255.0. With this information and selecting a desired ip address of 10.0.0.27, all the information required to setup the static ip address is known. STEP 2 – Update the Network Configuration The network configuration is stored in /etc/network/interfaces. Before making any changes to this file it makes sense to create a backup in case something goes wrong with the new settings. Creating the backup is simple. In the terminal type cp /etc/network/interfaces /etc/network/interfaces.bak Once this has been done, it is time to edit the interface file using the following command sudo nano /etc/network/interfaces Once this is done, something similar to the following should be seen:
 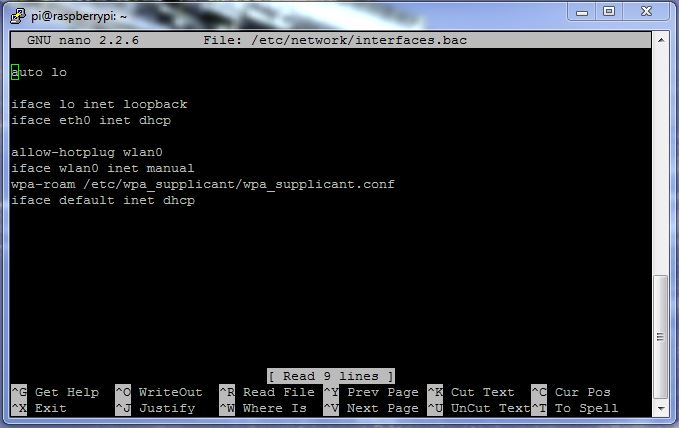 The line that is of most interest is the eth0 inteface that is listed as dhcp. The dhcp designation should be modified to static. Once this is done, the address, netmask and gateway information needs to added. The following screenshot shows an example of how the file should look when all of the changes have been implemented:
 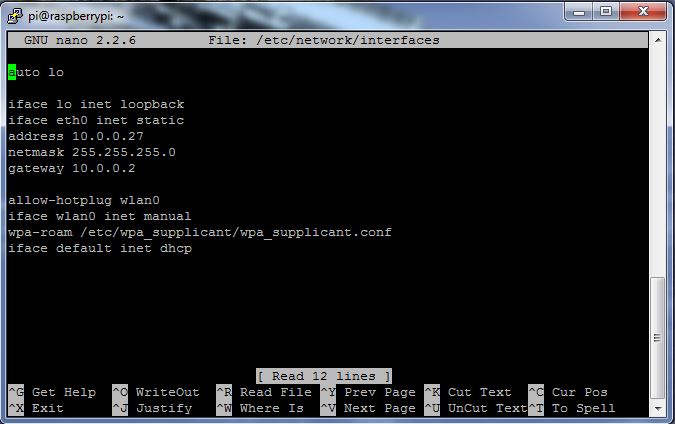 The updated interface file can be saved by pressing ctrl-o. Once the file is saved ctrl-x will exit the nano text editor. A reboot is required for the new changes to take effect. This can be done using sudo reboot STEP 3 – Setup a SSH Client A SSH client is needed to be able to remote into the RPi from any desktop or laptop. The most commonly used client is putty. It can be downloaded from http://www.chiark.greenend.org.uk/~sgtatham/putty/download.html Once installed it is very straight forward to configure. Run putty.exe. Enter the ip address that was selected in step 1 and make sure that the connection type is set to SSH. If the developer doesn’t want to enter this information each time, the session can also be saved at the bottom of the configuration.
 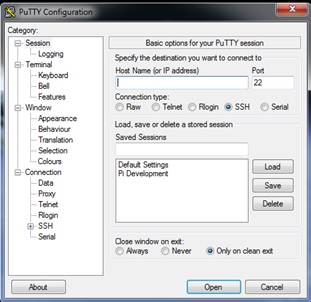 At this point the connection can be opened and remote software development and access of the RPi can commence!
Contact Us Today! [email protected]


